[house_meta_top/]
Do you love Halloween? Do you always plan to turn your home into your own little shop of horrors? Maybe you just want to get your kids into the spooky spirit of halloween, or – just as likely – you’re the kid who lives for halloween, just dressed up in adult clothes.
Oftentimes, lack of time and little money to spare means our ghoulish plans are cut short for this time of the year. From our end, we believe we can’t call our blog House.mt without helping fellow homeowners give life to a couple of nightmares.
These ghoulish crafts will be the perfect way to spice up your home and really get you into the spirit of Halloween. So grab your favourite broom stick and let’s take off!
The first DYI decoration which caught our eye were these LED eyebulbs from Craftriver. They’re incredibly easy to make – you could even get your children to help! All you will need is a few self-adhesive LED push lights which you can find in any supplies store and coloured markers.
Start by drawing a circle in the middle of the bulb to create the iris any colour. Then use a black marker to draw in the pupil – paint works well too as long as it’s not water colour (which could look too sheer). The last step is drawing veins around the iris to make your light-up eyeball look as authentic as possible.
There you have it! All that’s left to do is to stick them around the room wherever you feel is necessary. For an added spook factor, you could place some netting over the eyes, or maybe even faux cobwebs.
This is a great way to use uneaten apples. Follow this tutorial by InstuctablesLiving to find out how to make your own DIY shrunken heads.
Start off by preheating your oven to 93 degrees Celsius. Next, cut out holes near the top-middle of the apple for eyes. Then carve out the mouth slightly below your eyes. Here, you can be as creative as you’d like. Now that you’ve carved out the features, peel off the apple’s skin.
Next, take a lemon half and dip it in salt. Rub it all over the apple – squeezing as you go. Pay special attention to any indentations in the apple like the eyes and mouth. This will help keep the apples from going dark brown (of course, if you want your apples to look like old and withered heads, skip this step completely). Lastly, bake your apples for 6 hours.
Additional steps: After they cool, you could glue in some eyes and hair. (Add staples to the side of the mouth for added effect).
This craft is a great way to reuse and repurpose old mason jar lids. Brandy at TheCountryCook provides a detaield step-by-step guide on how to perfect these cute ornaments.
The great thing about mason jars is that they’re cheap to buy. You can use the jar as cute glasses or mugs to fill your seasonal drinks with (one provided below for your drinking pleasure). Moreover, you can reuse the jars for storage once Halloween is over. Remember, it’s always better than using plastic containers.
The first thing you need to do is get yourself in a well-ventilated area and lay down some newspaper. Lay down your mason jars bands, leaving a two-inch space between each one. Then, simply spray the bands with orange spray paint. After leaving them dry for a few hours, flip them over to spray paint the bottom sides as well. Allow the lids to completely dry overnight.
Once the lids are dry, it’s time to tie them together. Make sure your lids are all facing the same side and run your string/ orange yarn through them. Then pull as tight as you can – you really want a nice, taught string. Here you could have your child help you tie the knot. Once you’re done with that, just separate the lids evenly. Finish the piece off by placing some cinnamon sticks at the centre to act as the pumpkin stem and you’re done!
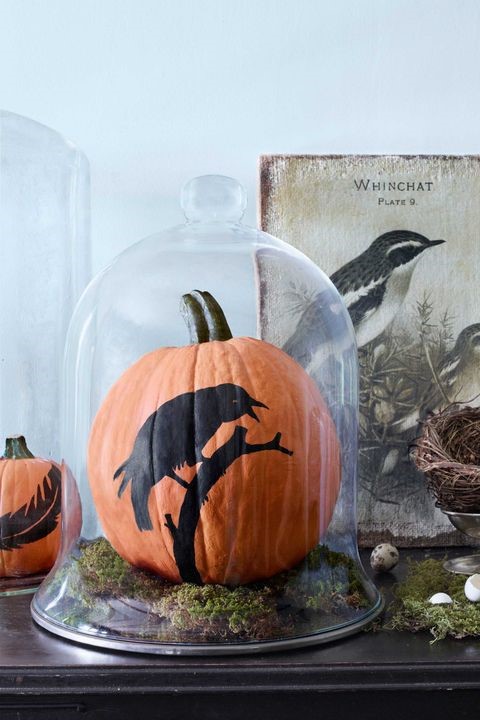
This simple Halloween craft is one your child will have tons of fun helping you make. All you’ll need is a pumpkin, some black paint and a stencil of a raven, a feather, or any spooky creature of your choosing. You can find prints of all kinds of shapes, or to make it even more convenient, CountryLiving provide you with two stencils ready for printing. (Malta may not stock up with the traditional orange pumpkins we are used to seeing on US television shows and the like, so feel free to buy a plastic one from your nearest toy/ crafts store).
This couldn’t be simpler. Just outline the shape of your template onto a pumpkin and fill it in with black paint. Then sit the pumpkin on a bed of faux moss inside a glass cloche to maximize both beauty and eeriness of the whole thing.
Who ever said poppers were only a Christmas decoration? OnionRingsandThings take the idea of trick-or-treat to a whole new level with these fun colourful party favors.
First, cut 2 sheets of orange tissue paper 12×7 inches. Cut 2 sheets of green tissue paper 12×10 inches. Next, lay the bigger sheets on top of the small sheets and lay a tube on the longer edge and glue the paper to it. Roll the paper tightly around the tube and glue the other edge down.
You’ll want to cut the pipe cleaners in half as they may be too long. Hold together the paper at one end of the tube, wrap a pipe cleaner around it, and twist it tight to close (think of it in the way a twisty tie holds dolls erect in their box).
Now, you can fill the tube with candy and toys. Then squeeze the other paper together at the other end of the tube, wrap a pipe cleaner around it and twist it tight to close poppers.
The final step is to decorate your popper. Glue eyes wherever and each way (it is Halloween after all), and design it to your heart’s desire. These Halloween party poppers are as fun to make as they are to receive so involve the kids and make it a fun afternoon activity!
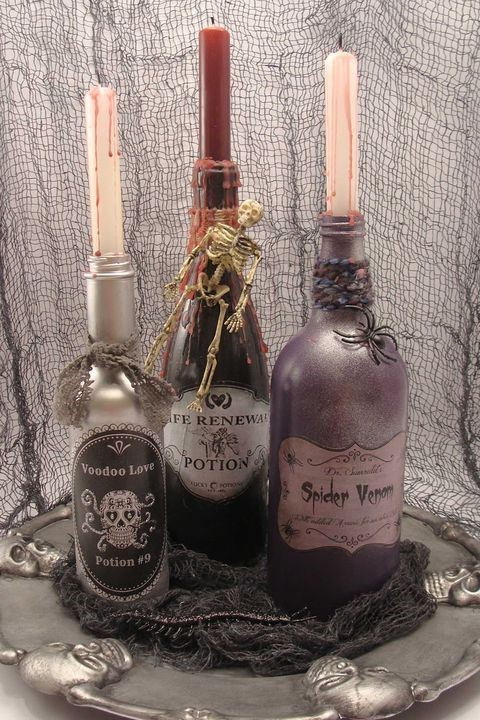
Make your wine habit count! Reuse and repurpose old wine bottles into these fun and eery looking potion bottles.
As with the Mason Jar Pumpkins, move into a well-ventilated area and spray paint your bottles whichever colour (darker colours such as purple, black, dark green and silver are recommended). Painting the bottles with normal paint is also fine. Extra tip: you could spray paint a silver colour on top of your darker base to give a distressed look to your bottle. Then wrap some yarn on the neck of the bottle, and stick the candle inside. You could also light the candles beforehand so by the time you come to assembling your bottle, some wax would have already begun to drip, thus adding to the eery effect.
Lastly, print a label (some are provided by the website linked above) and stick this on your bottle. And voila! You’re done.
CountryLiving hit another home run with this wickedly fun to make broom stick decor to hang over you snack table.
This is extremely simple to put together. First, fill your jars with the black sand and place the candle atop of it. Next attach your jars to the broom with black twine (make sure to secure these well). All you need to do now is to find the perfect place to hang your broom stick. This would add that perfect Halloween flare to your snack table.
Tip: Instead of black sand, you could even fill the jars with an assortment of candies, which your guests could then carefully pick out.
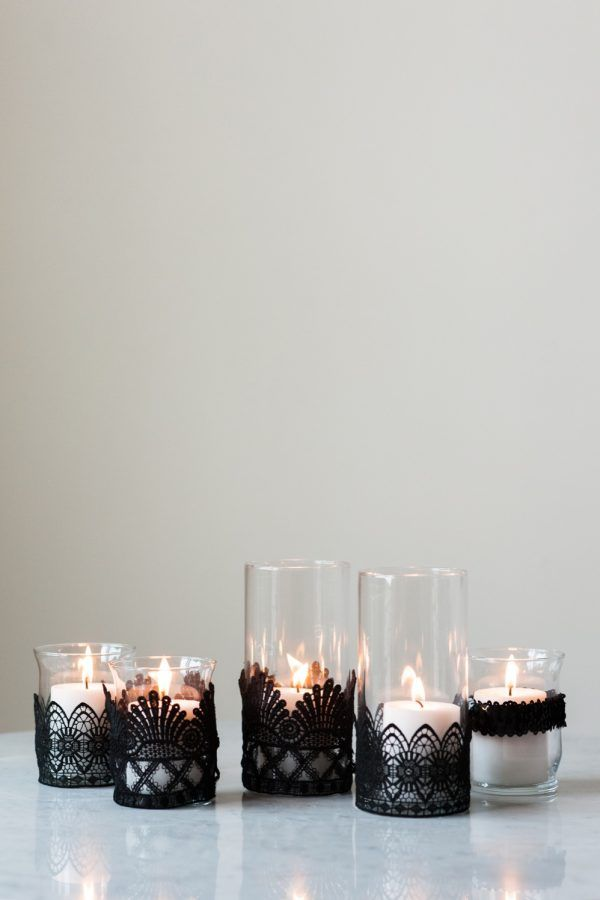
Set the mood for your spooky party with this lace-covered candle arrangement by Cyd Converse from TheSweetestOccassion. Place them on your mantel, fireplace, or your bookshelves to add a little festive touch.
Begin with glass candle holders (or clear vases would work, too) that have been thoroughly cleaned and dried. Then measure your lace trim around the circumference of the candle holder by simply holding it up to judge the length you’ll need. Allowing for a bit of overlap, trim your lace to size with scissors. Glue in place by running the rim of the vase with hot glue and press the lace to the glass. Remember to move slowly and carefully, as hot glue can be tricky.
Once everything has dried and set then you’re done. Insert and light your candle, and place it anywhere around the house.
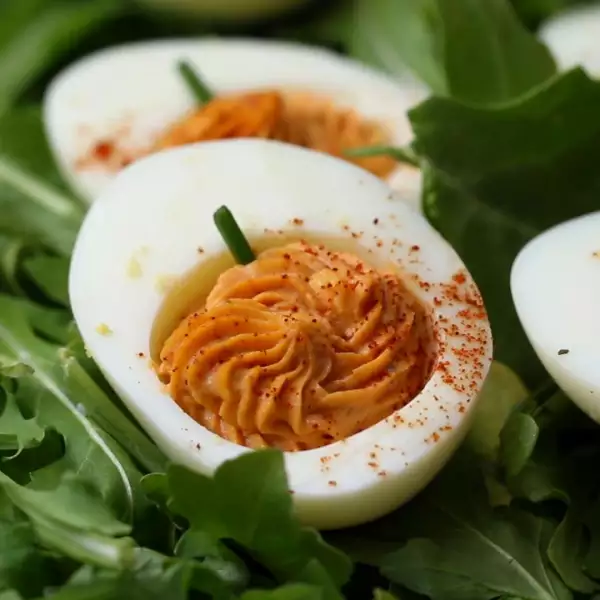
This recipe by Tasty is a great variation on a well-loved classic.
Peel and slice hard boiled eggs lengthwise. Separate yolks into a separate bowl. Next, add mustard, mayonnaise, paprika, salt, and pepper to the yolks, and mix thoroughly.
Fill a piping bag with the yolk mixture, and pipe into the empty egg whites. Lastly, sprinkle with paprika, and place a piece of chive to make it look like a pumpkin.
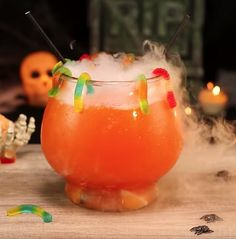
TheTipsyBartender has some fantastic Halloween themed drinks and mixes – this is just one of them.
And it couldn’t be simpler! Add your vodka, triple sec and pineapple juice to base of punch bowl and stir to combine. Pour over orange soda.
Drop in dry ice before spooning orange sherbet on top. Garnish with gummy worms.
Our team at House.mt is always on the look-out for spaces, places, and things that are being built up, torn down, modernised, restored, or re-purposed – be it by a big team or a one-man(or woman)-army.
Send us a message on our Facebook page or via email, info@house.mt.
[house_meta_bottom]
At House.mt, we try to focus our coverage on positive, uplifting design work in Malta,…
Alex Caruana, a frequent contributor in the popular local private group Id-Dar Maltija, has transformed…
“Detail is what separates the extraordinary from the ordinary.” This has always been my motto…
Greening up the facade of your home, apartment block, shop or office is about to…
Unmatched in their potential for cost savings and convenience, the list of smart home products…
A staggering body of studies make it clear: people really benefit from being in the…